

Is Google Colab free?
Hosted Python notebooks with free but dynamically limited accelerator access.
Current free offer summary
Colab offers a free-of-charge tier with dynamic, unpublished usage limits; free notebooks can run for at most 12 hours depending on availability and usage patterns.
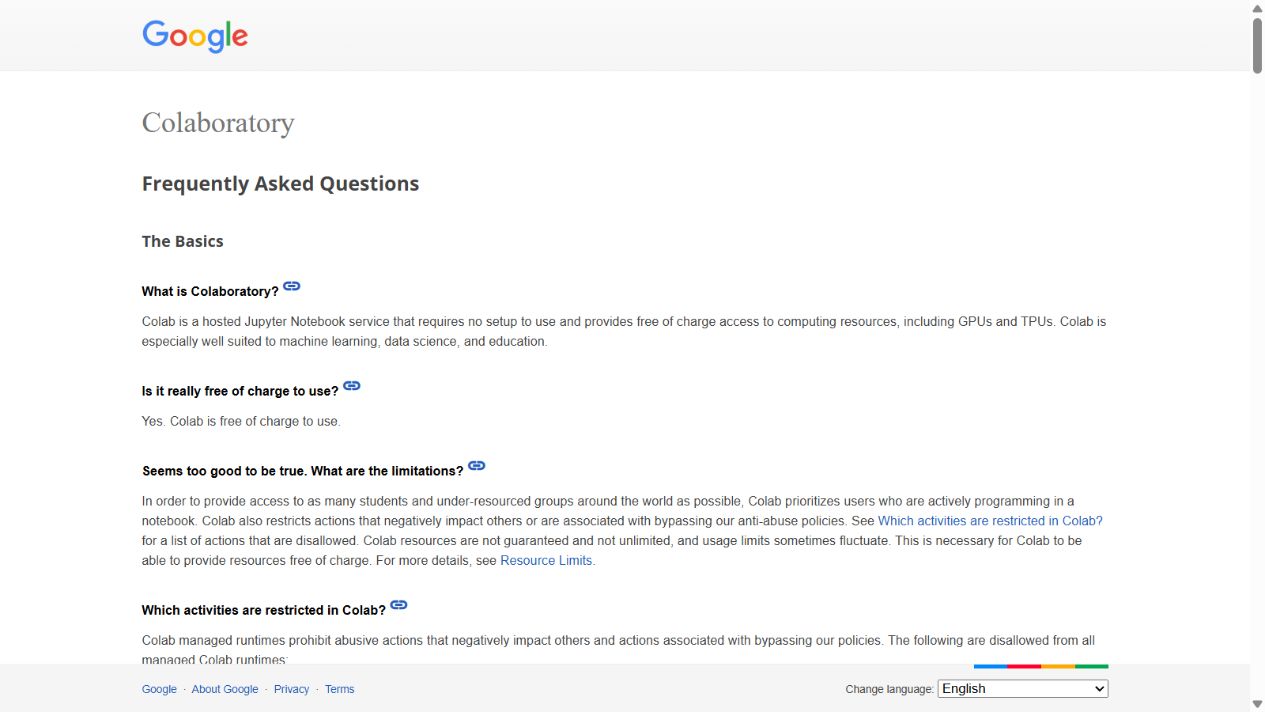
What Google Colab does
Google Colab is a hosted Jupyter notebook service for Python, machine learning, and data analysis. Its free-of-charge tier can provide GPU or TPU access, but Google deliberately keeps the usage limits and available hardware dynamic rather than promising a fixed allowance.
- Jupyter notebooks
- Python runtime
- Dynamic GPU access
- Dynamic TPU access
- Google Drive integration
Best for
- ✓ Quick Python prototypes
- ✓ Machine-learning tutorials
- ✓ Occasional GPU or TPU notebooks
Important limits
- • Google does not publish a fixed free quota
- • GPU and TPU types vary over time
- • Idle timeouts and maximum runtime depend on availability and usage
- • Free runtimes prioritize interactive notebook work; remote desktops, SSH shells and primarily web-UI workloads are restricted
FreeAIList verdict
Easy to start and widely taught, but unsuitable for workloads that require guaranteed hardware, a fixed quota, or uninterrupted long-running sessions.
Paid plans: Paid Colab plans and pay-as-you-go compute can increase availability, but resources remain subject to capacity and account usage.
About this practical guide
Sources checked Oct 16, 2026
On October 16, 2026, we created a separate notebook in an existing signed-in account, kept CPU selected for the word-count example and confirmed both CSV rows contained 6 words. We then selected T4 GPU and trained the tiny PyTorch model below: the output identified Tesla T4 and cuda:0. The notebook showed All changes saved and Restricted sharing. We invoked the CSV and notebook download commands, but completed downloads are unverified. With the owner’s approval, we reset only the demo runtime after each test; the final control showed Reconnect T4. No large-model training, paid plan or fresh signup was tested. Numbered mouse pointers are added reading aids over real screenshots. This guide check leaves the listing’s full verification date unchanged.
Compare free compute options1. Create and name a notebook
Open Google Colab, sign in and select New notebook. Click the notebook name at the top and replace the default name with something recognizable, such as ‘My script word counts’. For this walkthrough, use a new notebook so your other projects stay separate.
This exercise creates a small CSV from two sample scripts. You do not need to upload personal files, mount Google Drive into the runtime, install packages or use an AI assistant. Our notebook’s Share dialog showed Restricted access. Check your own sharing setting before putting private material into a notebook.
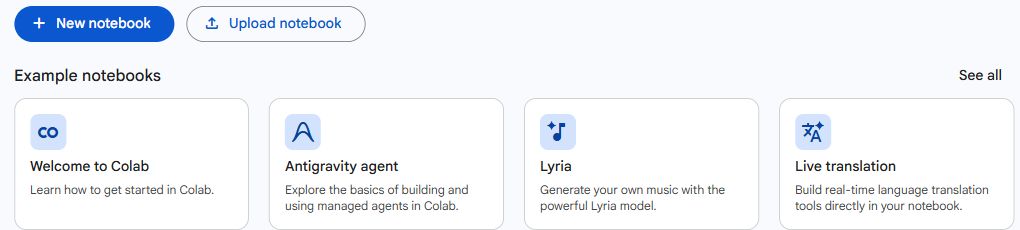
Start with New notebook. The example notebooks shown underneath are separate Google examples, not this test.
- Select New notebook, then rename it in the editor.
2. Choose CPU for basics or GPU for training
Open Runtime, then Change runtime type. Keep Python 3 and CPU selected for the word-count exercise in step 3. If you change a setting, select Save; if CPU is already selected, Cancel closes the dialog without changing it. CPU is sufficient for this basic Python task.
For model training, follow the separate T4 setup and PyTorch exercise below. Our account offered T4 GPU and v5e-1 TPU, while several premium choices were disabled. We successfully allocated a T4 for the training test; TPU was not tested. Colab’s free resources and limits vary, so a visible choice does not guarantee availability or a fixed allowance.
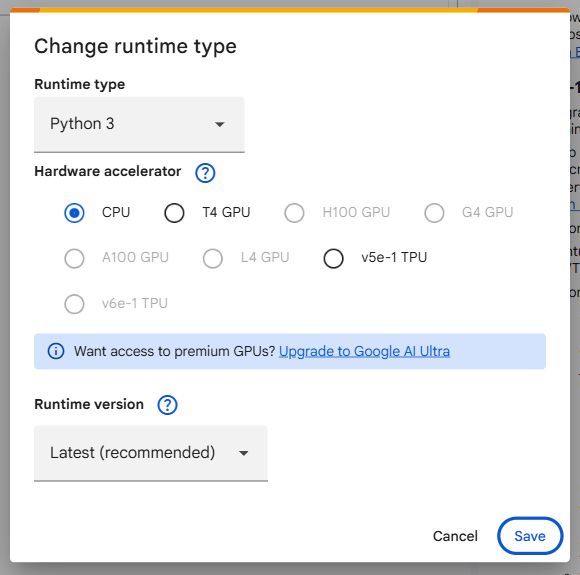
CPU selection for the word-count exercise. The next sections show the separately tested T4 route.
- Keep CPU selected for the starter code.
- Save only if you changed a setting; otherwise choose Cancel.
GPU option: select T4 for model training
Save your notebook and any temporary files before changing runtime type. Open Runtime → Change runtime type, select Python 3 and T4 GPU, then Save. Reconnect or run a cell to request the runtime. Our October 16 account successfully connected to a Tesla T4 without a purchase; allocation and free usage limits can differ for another account or another day.
Selecting T4 provides accelerator access when available. Your training code must also use it. The next example explicitly places the training tensors and model on CUDA and stops with a clear error when a GPU is unavailable. No TPU or premium GPU was tested.
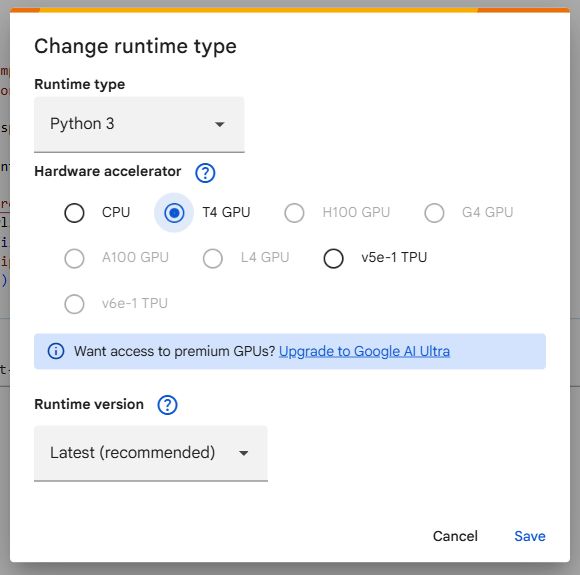
Actual T4 selection before our training run. Disabled premium choices were not tested.
- Select T4 GPU for the training exercise.
- Save, then reconnect to request the GPU runtime.
Train a tiny model on the GPU
Add a new code cell and run the original Python below in the T4 runtime. It trains a two-parameter linear model on 256 synthetic points to learn y = 3x + 2, using 200 optimizer updates. PyTorch was already installed in our runtime. This example needs no dataset upload, model download, package installation or Drive mount.
Our output identified GPU: Tesla T4 and Model device: cuda:0. Loss changed from 9.656835 to 0.000000, and the learned weight/bias printed 3.0 and 2.0. The loss is rounded to six decimal places; it does not prove an exact mathematical zero. Different runtime versions or hardware can change the result.
This checks that a small training loop really used the GPU. It is not an LLM fine-tuning exercise, a model-quality comparison or a speed benchmark. For your own AI model, first check its memory and package requirements, then save checkpoints and outputs before releasing the runtime. After this test, we saved the notebook and released the demo GPU with the owner’s approval.
Python — verify CUDA and train a tiny PyTorch model
import torch

if not torch.cuda.is_available():
    raise RuntimeError("GPU unavailable: select T4 GPU and reconnect.")
torch.manual_seed(7)
device = torch.device("cuda")
print("GPU:", torch.cuda.get_device_name(0))

x = torch.linspace(-1, 1, 256, device=device).reshape(-1, 1)
y = 3 * x + 2
model = torch.nn.Linear(1, 1).to(device)
optimizer = torch.optim.SGD(model.parameters(), lr=0.1)
criterion = torch.nn.MSELoss()
initial = criterion(model(x), y).item()

for step in range(200):
    optimizer.zero_grad()
    loss = criterion(model(x), y)
    loss.backward()
    optimizer.step()

print("Model device:", next(model.parameters()).device)
print(f"Loss: {initial:.6f} -> {criterion(model(x), y).item():.6f}")
print("Learned weight/bias:", round(model.weight.item(), 3), round(model.bias.item(), 3))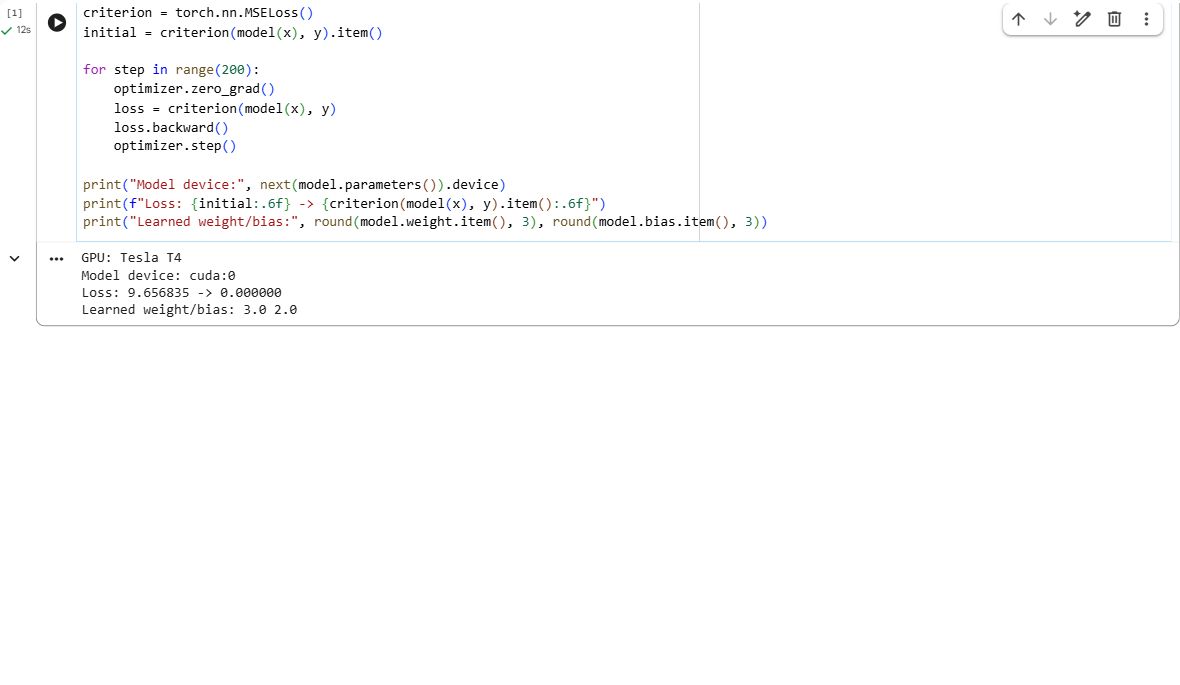
Real output from our October 16 T4 run. This is a tiny synthetic training exercise, not a benchmark for larger AI models.
- Confirm the GPU name and cuda:0 model device.
- Inspect the loss change and the learned weight/bias.
3. Run the script and check its output
Paste the Python below into the empty code cell. Select its triangular Run cell button, then wait for the runtime to connect and execution to finish. In our test the output read ‘Intro: 6 words’, ‘Tip: 6 words’ and ‘Saved: /content/freeailist-word-counts.csv’.
The program counts chunks separated by whitespace; it is a simple script-length check, not a language-aware word counter or speech-duration estimate. It writes a CSV with script and words columns. You can change the two sample sentences after the first successful run and compare the new counts. This is a notebook exercise, not an AI model quality or GPU speed test.
Python — count script words and create a CSV
from pathlib import Path
import csv

scripts = {
    "Intro": "Today we compare free voice tools.",
    "Tip": "Check the export rights before publishing."
}
rows = [(title, len(text.split())) for title, text in scripts.items()]
for title, count in rows:
    print(f"{title}: {count} words")

output = Path("/content/freeailist-word-counts.csv")
with output.open("w", newline="") as file:
    writer = csv.writer(file)
    writer.writerow(["script", "words"])
    writer.writerows(rows)
print(f"Saved: {output}")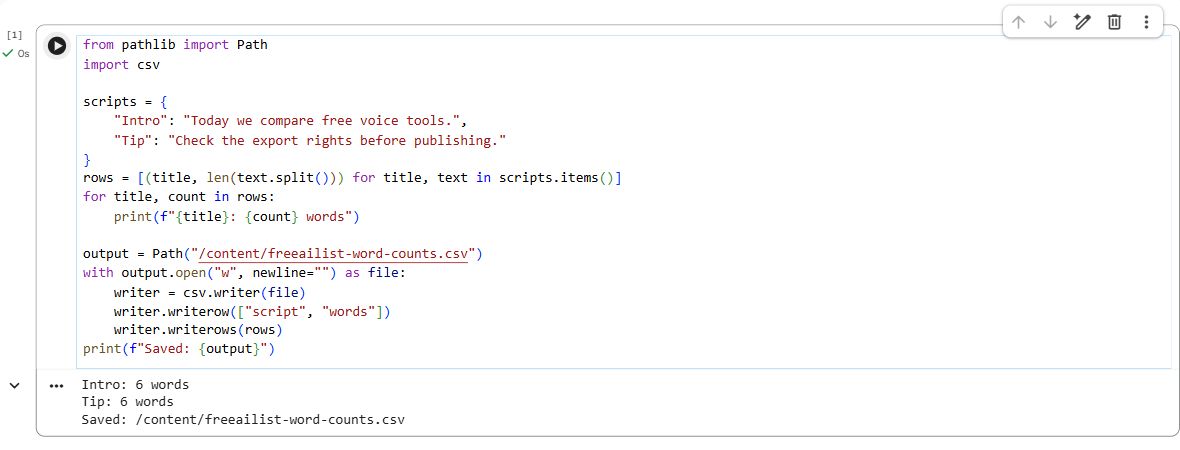
Actual output from our CPU run. The code uses Python’s standard library and makes no network requests.
- Run cell executes this code cell.
- Check both word counts and the saved file path below the code.
4. Inspect and download the CSV
Open Files using the folder icon on the left. Find freeailist-word-counts.csv; use Refresh if it has not appeared. Double-click the file to preview its table. Our preview showed Intro / 6 and Tip / 6, matching the printed output.
Right-click the file, or open its row’s three-dot menu, and select Download. Check your browser’s downloads and open the CSV to confirm it arrived correctly before ending the runtime. We verified the menu and invoked Download, but could not confirm a local file through this browser; the completed download is not part of our tested result.
The printed /content path identifies a file on the runtime, not a file already on your laptop. The notebook and the generated CSV are different items. Keep any result you need separately rather than treating the notebook’s save indicator as proof that its temporary files are backed up.
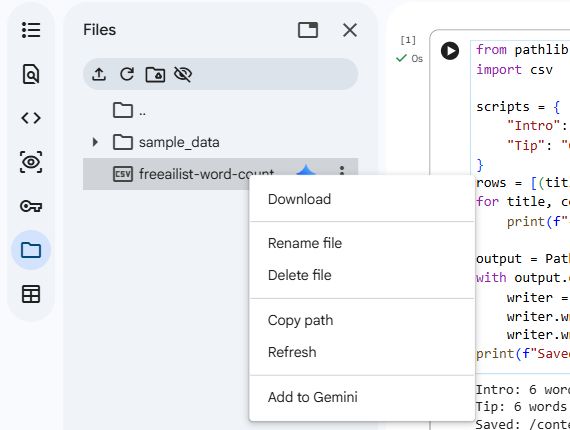
Download the generated result from the Files panel. Confirm the saved file in your own browser.
- Open Files with the folder icon.
- Open the generated CSV’s context menu.
- Select Download, then check that the file arrived.
5. Save the notebook and make a backup
Wait for the save indicator beside the notebook name. Our editor showed All changes saved, and after reloading it showed a saved time with the code and output still present. File → Save is also available. Colab notebooks are stored in Google Drive; runtime files are separate.
For a portable notebook backup, open File → Download → Download .ipynb. This is different from downloading the CSV in the previous step. We inspected and invoked this command, but a local notebook download was not confirmed. Check the resulting .ipynb in your downloads before relying on it as your only backup.
Keep the original notebook private while experimenting. You do not need Share, a public link, GitHub publishing or a Drive mount to complete this exercise. An .ipynb backup is useful for keeping the code and notebook structure together; the CSV is the small result you can inspect in a spreadsheet editor.
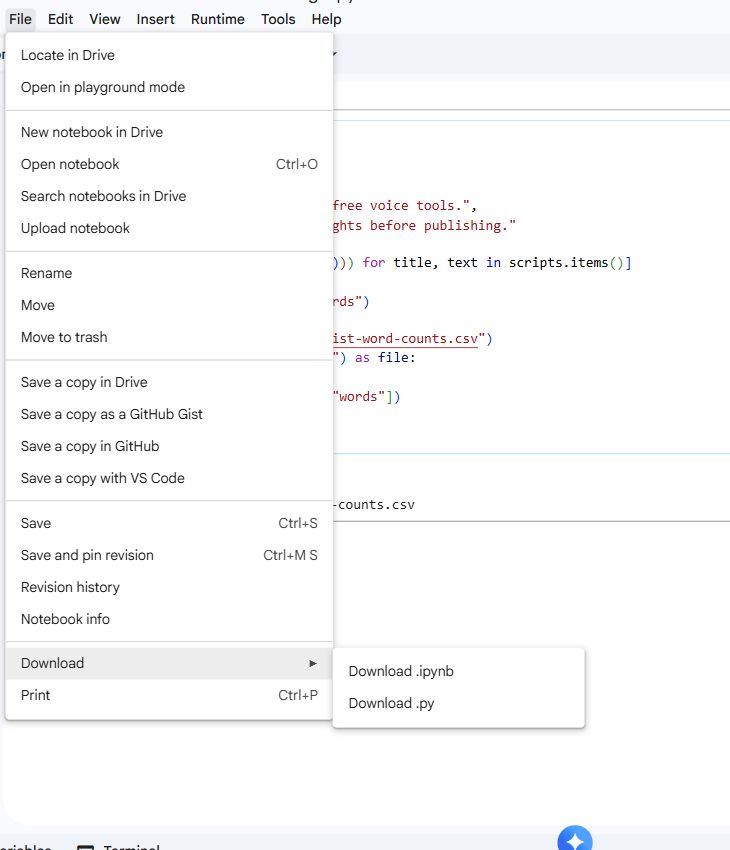
File → Download → Download .ipynb creates a notebook backup. It is a separate action from exporting the generated CSV.
- Open Download in the File menu.
- Choose Download .ipynb for a notebook backup.
6. End the runtime after saving your files
After confirming your notebook and required downloads are saved, open the connection-options arrow beside the runtime controls at the top right. Choose Disconnect and delete runtime. Read the confirmation: this clears the runtime’s local files and variables. Continue only when you have kept anything you need.
We used this action only on the new demo after the owner approved each reset. The notebook remained saved. After the CPU test the control changed to Reconnect; after the GPU test it showed Reconnect T4. The CSV values and training output were recorded separately; no other notebook or session was reset. Do not reset an unrelated runtime because it appears in a session list.
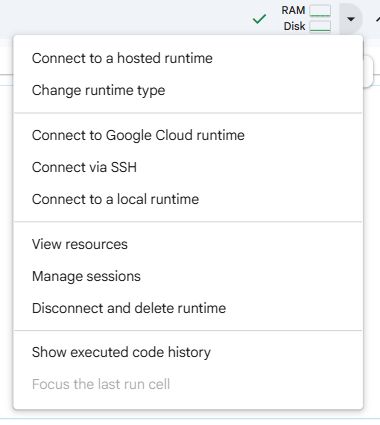
End only the intended runtime after preserving its files. Resetting clears temporary files and variables.
- Open the connection-options arrow beside the runtime controls.
- Choose Disconnect and delete runtime, then review its confirmation.
If your notebook does not behave like the example
If the connection is still starting, let its status change before repeatedly clicking Run. If Python reports an error, compare the pasted quotation marks, indentation and path with the code above. The test proves one successful CPU execution, not a guaranteed connection time for every account.
If the CSV is missing, check whether the cell completed and whether Files needs refreshing. Rerunning this example recreates the same filename. If your browser blocks a download, resolve that in the browser and verify the actual file before resetting the runtime. A successful code output and a successful browser download are separate checks.
If the GPU exercise reports GPU unavailable, check Runtime → Change runtime type and the account’s current availability message. Selecting hardware and moving the model and tensors to CUDA are separate requirements. Do not repeatedly reconnect to bypass a usage limit; try CPU for the starter exercise or wait until resources are available.
For larger AI workloads, review the code, model license, memory and dataset requirements before running them. Our tiny training test does not establish that an LLM or image model will fit or finish. Colab does not guarantee a fixed free GPU quota or uninterrupted runtime; save checkpoints for work you cannot afford to lose.
Colab’s limits and runtime FAQ ↗When to choose Kaggle Notebooks instead
Consider Kaggle when your work already uses its datasets or competitions, or when you want to compare another hosted notebook workflow. Our Kaggle page includes a separate beginner walkthrough with a tested CPU example.
The accelerator settings, quota rules and save workflow differ. A working Colab notebook does not establish that the same packages, files or hardware are immediately available on Kaggle. Check its current access details before switching a project.
Official sources
These links support the important free-offer claims on this page.
- Google Colab FAQ: free runtime access and limits ↗
Free Colab provides dynamically limited notebook compute without a fixed published quota. Free notebooks can run at most 12 hours depending on availability and usage. Free runtimes prioritize interactive notebook work; remote desktops, SSH shells and primarily web-UI workloads are restricted. Source review only, no fresh runtime allocation test.
- Google Colab overview ↗
Google describes Colab as a hosted Jupyter Notebook service requiring no setup and providing free access to computing resources including GPUs and TPUs.